KazTrix (Instabase) DataBuilder 1.0
Online Documentation
Please choose a topic you wish to learn more about. Underlined links are “clickable.” If you want to see more about a topic, click on the link. It is recommended that you go through this tutorial once carefully before you start creating and modifying databases.
Table of Contents
Beginning with KazTrix (InstaBase)
The KazTrix Toolbar
The KazTrix Toolbar includes icons that run some of the most frequently used commands. All of the KazTrix commands can be accessed through the Menu Bar above the toolbar.


Records
Creating your first record
As soon as you create a new database, a screen with blank fields will appear. This is the first record that KazTrix automatically creates for you. Now, simply enter your information.
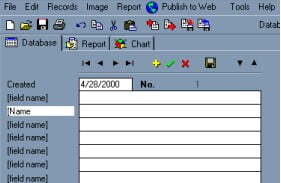
1. The first thing you should do is create your field labels. The labels are the first row of empty fields to the left of the KazTrix window. These labels describe what information this field will contain, for example: Name or Address or Phone Number. You may click on a label to change it (the first one will be already highlighted in yellow). Once all of your labels are ready you may click the “Save Labels” button to save them. You may edit these fields at any time. See Customizing your Database for more information.
2. You are now ready to start entering information. All data should be entered inside the blank white fields to the right of the labels you have just created. Once you have entered all information for the first record you may proceed to create a new record by clicking the button with the “plus” sign on it. ![]()
As soon as you enter the information in the second record, click the button with the “check mark” ![]() to save your entry. Only then you will be allowed to add another record.
to save your entry. Only then you will be allowed to add another record.
TIP: You may also use the Insert key on your keyboard to add a record. Similarly, you may press Ctrl+S on your keyboard to save your changes.
Adding a new record
![]() Add new record:
Add new record:
You may add as many records in your database as you wish, one at a time. Each record is assigned a number starting at number 1.
![]() Save changes:
Save changes:
Click this button to save the latest changes made since your last save. You must save your database if you wish to activate a new function such as Backup and Restore, Report, Import and Export etc.
![]() Cancel last edit:
Cancel last edit:
Clicking on this button cancels the last edit.
Editing a record
At any time you may access a record and change its information and the database fields. After all changes have been made you should click the Save ![]() button or press Ctrl+S to save your changes.
button or press Ctrl+S to save your changes.
Deleting a record
Once a new record is created, you may delete its contents and enter new information but you cannot delete the record itself.
Printing a record
Please see printing.
Attaching a file to a record
Attaching a file to a record is a new feature of KazTrix! You can attach a file of any type to any record you wish. This is useful in case you have another type of file on your computer (i.e. a word processing document or a spreadsheet) that is associated with the record you have created.
To attach a file, simply move to the record that you wish to attach a file to and select “Attach Documents” from under the main KazTrix file menu. A file attachment window will then appear. Select “ADD” from this menu to browse your hard drive and attach as many files as you wish to the record. Attach a file by selecting “OPEN.” To remove a file, highlight it in the file attachment window and click “REMOVE.”
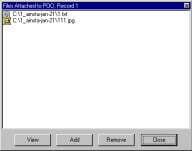
Click “VIEW” to view the contents of the attachment. As long as the original application is associated in your Windows setup, the original application will launch and display your file.
Once a record has an attachment, a button marked “File Attachment” shows up under the record. This button will vanish when no files remain attached to the record.
Multimedia Files
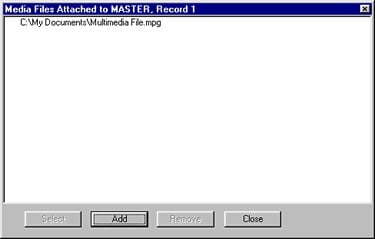
Now, you can attach a wide range of multimedia files to your databases including WAV sound files, MIDI files (MID, and RMI), Video for Windows (AVI), and MPEG/MPG, and MP3 files. Thus, you can have full sound and video files attached to each record of your database! The best part is that these files can also be published to the internet!
You can attach multimedia files by clicking the “Attach Multimedia Files” button ![]() . Simply click the button, and explore to the location of your multimedia files. Clicking the “Attach Multimedia Files” button again will display all the attached multimedia files for that record.
. Simply click the button, and explore to the location of your multimedia files. Clicking the “Attach Multimedia Files” button again will display all the attached multimedia files for that record.
To remove a multimedia file, click the “Remove” button.
If you have multiple files attached to a record, you will have to click the “Attach Multimedia File” button again, click the appropriate file in the list, then click the “Select” button.
Playing multimedia files
Click the Green play button to begin viewing your attached multimedia file.
Clicking Pause will pause the playback. Next, you have the Fast-forward to the end. Beside Fast-forward is “Rewind to the beginning”. Click this if you wish to rewind the file to the beginning.
Finally, there are the Fast-forward and Rewind buttons. Click Fast-forward if you wish to scroll ahead in the media file slightly. Click Rewind if you missed something and you wish to view it again.
Multimedia files can also be played from the on-line database applet!
Images and Graphics
Importing
Inserting images and other graphics in your database is one of KazTrix’s key features.
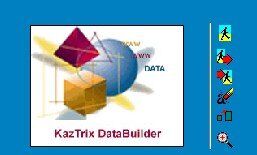
The import, copy, paste, delete, stretch and zoom buttons are located beside the graphics window.
KazTrix now supports a wider range of picture file formats then before, including GIF, bitmaps (BMP), Icons (ICO), Metafiles (WMF) and Enhanced Metafiles (EMF). The variety of JPEG file headers that newer digital cameras use has been adjusted for (i.e. digital camera JPEG picture reproduction is now improved). You can directly import files in KazTrix by clicking on the load image button.
Full View
Once an image has been inserted in your record, it retains its original size. To view the full sized image press on the zoom button.
Editing
You can select to open the image to the Paint program that comes with Windows. You can access this option from the Image menu.
You may transfer the image from your database into any other image editor by clicking on the copy button and then Ctrl-V (or pasting) into your image editor program or by using the import graphic button.
Web Publishing
When you publish your database to the internet, KazTrix automatically converts your images attached to records to web formats. The default format is JPEG, however, if you have included GIF images in your database, they will remain as GIF images.
Printing
Record or Database Printing
To print your data select File->Print from the main menu or press on the ![]() button.
button.
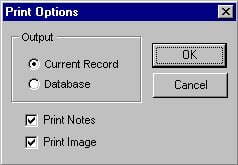
From the Print Options dialog box, select Current Record or Database to print either one accordingly. You may also choose to print the contents of the Comment Box and/or the pictures you may have in your records.
The Preview Screen
Click on OK to continue. You will then see the Preview screen which lets you see what your database will look like when printed. Through the preview toolbar you may do the following:
(follow the icons from left to right)
– Zoom in to the previewed page to, fit the window, sized to original size or fit to page width.
– Browse through the pages to be printed with the red navigational arrows (similar to the ones in KazTrix window).
– Setup and select the printer.
– Print your database or record.
– Save the preview as a Quick Report.
– Open a previously saved preview.
– Close the preview to cancel the printing.
Web Publishing
THE KazTrix WEB Wizard
(Web Publishing)
KazTrix Web Ready lets you easily publish your data (including comments, media files, attachments and images) to the web for everyone to see, search and browse through!
After you follow the easy publishing process, KazTrix creates what we call an “on-line engine” for your database. Essentially, KazTrix creates a new web page specifically for the on-line engine. By using the KazTrix Web Wizard, you can customize this page (before it is published). More experienced users can customize the page even more by altering the HTML code that makes up the page (after publication), however, our new wizard allows a great deal of customization, and you don’t have to know HTML at all!
All you need to “Publish to the Web” is access to your web-site!
The Simple Wizard
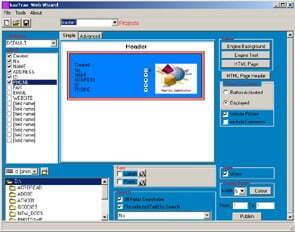
Open the KazTrix WEB Wizard by clicking ![]() on the main KazTrix toolbar (it can also be opened by selecting “Publish to Web” from the report screen output pull down menu). Click the “simple” tab for basic functionality and operation.
on the main KazTrix toolbar (it can also be opened by selecting “Publish to Web” from the report screen output pull down menu). Click the “simple” tab for basic functionality and operation.
Because the KazTrix WEB Wizard allows you to fully customize an on-line engine, it also allows you to save your configuration. It saves your choices as “Projects.” If you have previously created a project, you can open your project to publish (or to change it) by selecting “Open Project”from the main “File” menu of the KazTrix WEB Wizard located at the top of the KazTrix WEB Wizard screen.
If you do not have a project, simply select “New Project” from the main “File” menu of the KazTrix WEB Wizard. Projects can also be closed, saved or deleted by selecting the appropriate option from the main “File” menu of the KazTrix WEB Wizard screen.
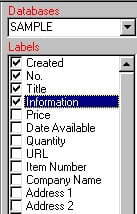
From the list of databases shown in the drop down menu, select the database you wish to publish to the web (you may select only one database at a time).
As soon as you have selected a database, a list of labels (otherwise known as field names) for that database will appear in the white window area below the database selection box. Indicate which labels you would like to publish by checking the check-box next to the appropriate label.
By pressing the “Publish” button, the files that KazTrix needs in order to create your on-line engine are produced. However, before you can publish these files, you need to save them to your hard drive.
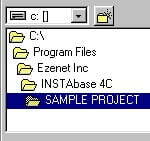
Therefore, before you actually press the “Publish” button, select the directory that you would like to save your completed files in with the pull down directory box located just below the record window. It is reccommended that you save your files to an empty directory (KazTrix prompts you to do this so you’ve probably done it already).
The features that run along the left side of the KazTrix WEB Wizard allow you to change the appearance of the on-line engine. You may select the colour of the Engine Background, the colour of the text of the records in your database (the Engine Text), and finally the colour of the HTML Page itself. Click on the buttons to see a list of colour choices and experiment until you find a combination to your liking.
You can also select a title for your page by clicking “HTML page header” and entering in a word or phrase for your on-line database.
Finally, both the images and comments (if you have included these) can be selected to be either “button activated” or “displayed”. “Button activated” means that the images or comments remain hidden until the “view” button is selected by a user of the on-line database. “Displayed” means that the images and comments are visible all of the time. Don’t forget to choose to include either the pictures or comments by checking the appropriate check-boxes!
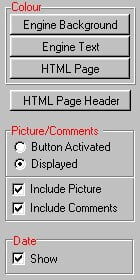
After you click “Publish” you will be given the option to upload your files, or to preview your database locally.
Note: NEW – Web publishing allows for ALL fields to be selected.
You will be given the choice to upload “now” or “later.” If you choose to upload right then and there, the KazTrix WEB Wizard and the KazTrix Upload Utility will most of the work for you (including remembering the names of your files and where to publish)! If you choose to upload later, simply make sure you save your “project.” Once your projects is saved, open your project when you are ready to upload, select publish once again, and then select “upload now.”
NEW FEATURES ADDED IN 1.0! The most noticeable difference is the addition of the “Advanced” view in the Java applet preview window. Selecting advanced will include a table output in the online database. This is a powerful feature that allows users more sorting and viewing features. Selecting the simple tab will exclude the table output.
The Advanced Wizard
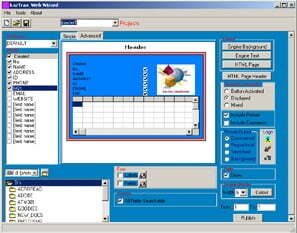
The Advanced tab will allow you to select the more advanced features of the improved KazTrix WEB Wizard. The first thing you’ll notice is the displaying of a table in the database preview. The next thing are more Picture Output options. Most of the features that are available with the SImple Wizard are available and also apply to the Advanced Wizard.
The table view is a powerful new tool that allows users to sort the data on your online database. With the table, users can sort data in any field in ascending or descending order simply by clicking on the field label. The field labels will be displayed across the top of the table. Each individual record will occupy a row across the table.
The new options under the Picture/Comment section allow you to have your pictures and comments button activated, displayed, or mixed. When mixed is selected, the picture will be displayed while the comments will be button activated. Also new is a Picture Output field.
Under Picture Output, you now have the option of selecting Constrained, Proportional, Stretched, or Background. If Constrained is selected, the images in the picture box will be adjusted so they fit best within the box. Proportional is selected, it will be stretch, keeping it’s proportional size, until either the height or the width of the image fits the picture box. When Stretched is selected, both the height and width of the image will be stretch to completely fill the picture box. Selecting Background will stretch your image across the background of the online database.
Logo Section
The Logo section allows you to place your logo or other graphic on the applet. Your logo can either stretch to the whole applet, or replace the image box (when there is not a picture to view).
![]()
Advanced On-line Field Search
Also in the advanced tab, you can mix and match which fields you would like to have searchable. Move your mouse over to the main display window in the KazTrix Web Wizard and you will find you can select which fields to have searched by visitors to your on-line database.
More New Features
To Print Records, simply click the “View Current” button to view the currently displayed record. A new window will open, with the record nicely formatted for printing. Next, use your browser’s print feature to print out! The online Java applet now supports up to 95 fields per record online!
A powerful new addition is the ability to view attached files. When you publish to the web, the attached files are published as well! Simply click the File Attachment button next to the navigation buttons, and a list of all attached files will be presented. Select which attached file you wish to view, and click View.
Using the KazTrix Web Wizard, you can now select a background image for your online applet. The possibilities are endless!
Please note that you should always keep in mind size considerations when publishing your on-line database. More fields and more records means slightly more loading time for your viewers.
Uploading your data
To upload your data, just follow the simple steps as detailed in the KazTrix Upload Utility section of the help file.
If you have used the KazTrix WEB Wizard and have selected “Publish Now,” the KazTrix upload utility will open automatically for you. Otherwise, the KazTrix Upload utility can be accessed right from the KazTrix WEB Wizard screen by clicking “Upload Utility” from the “Tools” menu on the KazTrix WEB Wizard menu bar.
Online Features
1. If a field contains a web address, it will be highlighted in RED letters and a small button will appear to its left. You may point your browser to go to this web address by clicking on the small button.
2. Records containing Pictures and/or Comments will cause the two buttons labeled “Picture” and “Comments” to appear enabled with bold letters if this option has been selected when you customized your on-line database.
3. Just like the Windows version of KazTrix, the online database lets you search the database. To search on a specific field click on the radio button to the right of the field and enter your search criteria in the space provided. Click on “Find First” to see if there is a match for your search. If a match exists, KazTrix will jump to the appropriate record containing that information. You may click on “Find Next” to see if there are other records that contain the same information.
4. To Print Records, simply click the “View Current” button to view the currently displayed record. A new window will open, with the record nicely formatted for printing. Next, use your browser’s print feature to print out! The online Java applet now supports up to 95 fields per record online!
5. A powerful new addition is the ability to view attached files. When you publish to the web, the attached files are published as well! Simply click the File Attachment button next to the navigation buttons, and a list of all attached files will be presented. Select which attached file you wish to view, and click View.
Using the KazTrix Web Wizard, you can now select a background image for your online applet. The possibilities are endless!
6. Please note that you should always keep in mind size considerations when publishing your on-line database. More fields and more records means slightly more loading time for your viewers.
This feature utilizes Java technology which requires web browsers Netscape and Internet Explorer versions 3 and up.
Uninstalling KazTrix
How to uninstall Kaztrix?
To uninstall KazTrix please follow these simple steps:
Click on the Uninstall KazTrix icon in the Programs menu
or
1. From your “Start” menu select “Settings–>Control Panel“.
2. Double-Click on the “Add/Remove Programs” icon.
3. Select KazTrix and click on the “Add/Remove” button.
Please note that some files might not be removed automatically. You will have to remove them manually.
Labels
Editing Labels
KazTrix’s user-friendly interface, allows you to easily modify the database to suit your needs.
Once you create a new database, click on the database labels and enter your text.
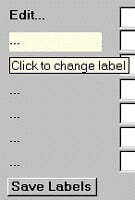
When finished modifying the labels, click on the Save Labels button to save. This button will pop-up every time you make any changes in your labels.
Adding and Removing fields
KazTrix 4.0 allows you to add more fields than the pre-determined 15.
You may have up to a total of 100 fields in any of your databases.
To add more fields click on the ![]() button and enter the number of fields you wish to add. Similarly, to remove fields from your database click on the other button and enter the number of fields to remove.
button and enter the number of fields you wish to add. Similarly, to remove fields from your database click on the other button and enter the number of fields to remove.
KazTrix Upload Utility
KazTrix FTP
The KazTrix Upload Utility (or FTP application) is a program that allows you to transfer your files to your web-site (or to any computer running an FTP server). Use this application after you have created the files necessary for publishing your database to the web. Of course the KazTrix FTP application can also be used to transfer files for other uses as well! Unlike many other FTP applications, you do not have to select “binary” or “ascii” format when uploading or downloading files, instead, the KazTrix Upload Utility automatically knows which type to select. The KazTrix Upload Utility also knows which files KazTrix Web Ready uses to publish to the web and will display only those files (as long as the “KazTrix files” option is selected on the main screen of the upload utility).
The main screen looks like this:
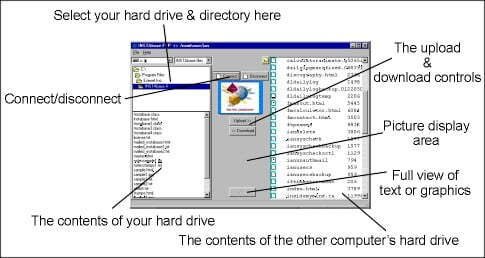
1. Select “Connect” to begin. You will be prompted for the ftp address of your web-site as well as your password and user name. These must be assigned to you before you can have access to the other computer.
2. Select the drive in which your files are located (if you access the Upload Utility from the KazTrix WEB Wizard this will be selected for you).
3. Highlight the files on the source system (your hard drive).
4. Transfer the files using the “upload” button located between the listboxes.
Notes:
- · Click on the “upload” button to transfer files from the local to the remote system.
- · Click on the “download” button to transfer files from the remote to the local system.
- · File uploads and downloads may timeout, if this happens you will have to reconnect.
- · If you want to preview a picture or text before you upload it, highlight the file and click “view.”
- · Multiple files can be selected by holding down the “Ctrl” key and using the mouse to highlight various files.
- · The KazTrix FTP application will remain open until you close it via the “exit” command.
Uploading KazTrix Files with Other Applications
When uploading files with an FTP utility OTHER THAN that provided with KazTrix, make sure you follow the following guidelines:
1. All files with the extensions .txt, .dat and .html should be uploaded in ASCII format
2. All files with the extensions .jpg and .class should be uploaded in BINARY format (media files and applications as well).
3. The file KazTrix.class (the online database engine) must be uploaded retaining its original text case (case sensitive). In other words, if this file appears on the remote server as KazTrix.class or KazTrix.class it will not work.
4. The KazTrix Upload Utility recognizes which files it needs to upload. Therefore, if you use another FTP utility, we recommend saving the “published” files into an empty directory on your hard drive so you don’t get mixed up as to which files KazTrix Web Ready needs.
After uploading your files either with the KazTrix Upload Utility (or on your own), simply point your browser to yourdatabasename.html to view it.
(eg. www.yoursite.com/yourdirectory/yourdatabasename.html)
Template Wizard
How to use Template Wizard?
To open the Template Wizard, click on the Tools menu, and then select Template Wizard. The Template Wizard allows you to create a template of fields for your use if you plan on using the same structure with multiple databases.
First, create a new template by clicking the “Create New Template” button, or by clicking on File, and New.
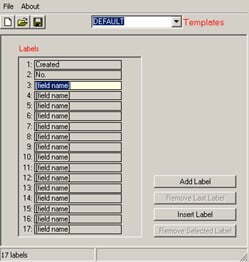
Second, in the Labels section, begin renaming your labels as needed. You can also use the Add Label button to add more labels if need be. Should you have too many, simply use the Remove Last Label or Remove Selected Label button to remove. Insert Label will insert a blank label before your selected label.
When you’ve finished editing your labels, you must save your Template. To do so, click the Save Template button, or click File and Save.
To use your newly created Template, quit the Template Wizard. Create a new database, and use the drop-down box to select your Template. Now, you will have a database with fully completed labels, and you can begin entering data,as you need.
Events Alarm
How to use Events Alarm?
This allows you to set and view events for the day.
The Events Alarms is handy program, which resides in the System Tray. Events Alarm allows you to schedule and view events you set throughout the day, as well as launch KazTrix 1.0 with the click of a button. You can also launch Events Alarm from the “tools” menu.
A window will pop-up on your screen when the time you set for an event has occurred.
Right-clicking the Events Alarm button in the System Tray will bring up its popup menu. Here, you can Launch KazTrix 1.0, View Today Events, or Close.
Launch KazTrix 1.0
Selecting this option will launch KazTrix 1.0. This may be handy if you have a huge start-menu, or no desktop space for a shortcut icon.
View Today’s Events
Selecting this option will display the events you have set for today. If none for the day are set, you will be given the option to set some events for the day. The events are displayed in table format, with three columns: one for the date, one for the time, and one for the name. You can specify the date and time of an event simply by clicking the even, and changing the date and time using the pull-down menus.
To change the date, simply pull-down the menu, and browse the calendar until you’ve selected the appropriate date. To change the date, highlight each field in the time you wish to change, and change as appropriate.
Adding a New Event
Use the “Add Event” to add a new event.
Close
Select this option if you wish to shutdown the Events Alarm.
